For some time I have been thinking of making a pen case with a zipped closure I have a piece of black English bridle leather for the outside and something brighter for the inside.
And I now have a template.
![DSC_0187[1]](https://farm2.staticflickr.com/1577/25056842421_e5b24cb13e_z.jpg)
This case will be for oversize pens with a cap diameter of between 18 and 21 mm and a length of 150 mm.
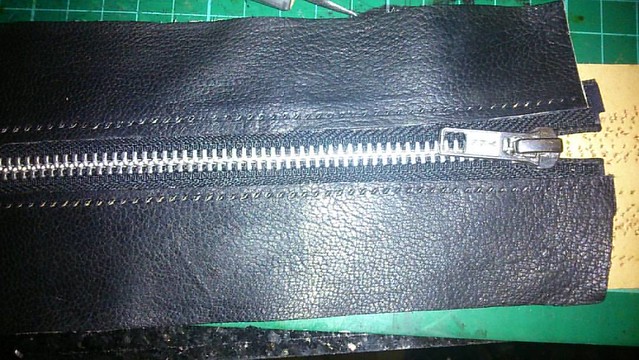
I also have a zip although the material is not as wide as I require so I will either order another or add some thin leather to extend the sides which will be dyed black.
![DSC_0191[1]](https://farm2.staticflickr.com/1619/24856952640_4f91a91b63_z.jpg)
![DSC_0192[1]](https://farm2.staticflickr.com/1615/25034360982_842e144110_z.jpg)
I have glued the strips of leather to the tape along the edges of the zipper and have dyed it black. I plan to sew this in place to add strength.
While taking a break from sewing as it is all done by hand takes some time. I started to look at the inside which is going to be yellow.
![DSC_0253[1]](https://farm2.staticflickr.com/1577/25014063390_7871d62e3d_z.jpg)
To give me a shape to work with I am using a 21 mm dowel to help to create the slots which are glued and then sewn in place.
![DSC_0256[1]](https://farm2.staticflickr.com/1493/24682912393_42f81a7774_z.jpg)
If you look closely you can see the template underneath the yellow leather. I have also added position marks on the edges of the leather and the new cutting mat so I can reposition the leather in the same place each time and use the lines on the mat to help to keep things square.
Once the first pen slot was in place and square I proceeded to sew the other three slots.
![DSC_0263[1]](https://farm2.staticflickr.com/1626/24727442193_213f1690a3_z.jpg)
Having thought about the opposite side from the pen slots I found some Rhodia plus size pads stapled at the top. I decided to cut a slot in the left side in order for this to work I needed to cut another piece of leather. Yes I could have cut a thin strip of leather as that is all that would be seen but I would know :).
![DSC_0266[1]](https://farm2.staticflickr.com/1485/25261096141_92c9c7501e_z.jpg)
![DSC_0269[1]](https://farm2.staticflickr.com/1617/24727447783_97774f950d_z.jpg)
I did many test fits being unsure of exactly how I was going to proceed I decided eventually just to get on with it.
So I did
![DSC_0270[1]](https://farm2.staticflickr.com/1584/24723574504_0f2feb4dd1_z.jpg)
I started at one side and worked my way across gluing a little at a time here you can see the zipper with the additional leather side pieces. I started with the zipper closed and at the end with the tab on and worked halfway. Once I was halfway I went to the other end and glued that in place. I then went back and filled the gaps.
![DSC_0273[1]](https://farm2.staticflickr.com/1648/25058583250_25807e5968_z.jpg)
![DSC_0276[1]](https://farm2.staticflickr.com/1699/25235926672_a4bc4dbc95_z.jpg)
![DSC_0281[1]](https://farm2.staticflickr.com/1549/25328005286_962c7f8f13_z.jpg)
Here is the all important inside I am going to add a flap inside above the pen slots which will serve two purposes the first to stop the pens from rolling around, the second is to cover the zip when pens are being removed to stop them being scratched.
![DSC_0277[1]](https://farm2.staticflickr.com/1517/25354197705_e717e2a95d_z.jpg)
![DSC_0282[1]](https://farm2.staticflickr.com/1619/25328006756_5af4bc109d_z.jpg)
I need to decide on the outer cover now.
I decided on a Piece of black English bridle leather for the cover I laid out the case on the leather and marked around it. Taking my trusty head knife and cut out the shape.
![DSC_0292[1]](https://farm2.staticflickr.com/1652/25283257072_78d355f4b9_z.jpg)
Everything looked fine until I remembered I had made this same mistake before.
The cover needs to wrap around the case when it is closed
![DSC_0286[1]](https://farm2.staticflickr.com/1452/24770961414_d209190f1c_z.jpg)
As you can see it is too short.
The leather is Sedwick’s English bridle leather and is quite expensive as it is traditionally made. there is an interesting video on youtube if anyone wants to see the process.
I now need to come up with a creative way to correct this problem
I referred to my Al Stolman book and found a three piece solution to this problem a front back and spine piece. the spine piece curves around the front and back pieces.
I cut the spine piece and made some groves where I wanted the leather to bend I used a bone folder to help this fold to take shape.
![DSC_0328[1]](https://farm2.staticflickr.com/1524/24864846223_620b2383bc_z.jpg)
To help hide the edges and add a little colour to the front and back I decided to make some piping. To do this I took some leather thong and strips of yellow leather note the location of the cutting mat which I used to help form the piping.
![DSC_0330[1]](https://farm2.staticflickr.com/1708/24864847843_0c0980e9af_z.jpg)
Add glue and fold the leather over the thong and the mat stops the leather going the wrong way.
![DSC_0334[1]](https://farm2.staticflickr.com/1706/25398746771_eec30197d8_z.jpg)
Once the piping was ready I attached it to the spine piece the thong is 10 mm shorter than the spine piece, but the yellow is longer this means when I sew the case together then the thong will not be in the way.
![DSC_0337[1]](https://farm2.staticflickr.com/1446/25124029629_c2df0754c9_z.jpg)
The three piece are now ready to be joined together I am going to take my time and make lots of measurements. I want a slight overhang around the edges but need to aware that when I sew the inner and outer pieces together the thread will show inside. the spine piece will be sewn to the front and back independently before attaching the outer cover to the inner section. I hope that makes sense :).
Once I had decided where the three pieces were going to joined together I had to prepare the leather for gluing at first I sanded the leather to accept the glue.
![DSC_0346[1]](https://farm2.staticflickr.com/1711/25532382565_3618f92df8_z.jpg)
This left two full thicknesses of leather at the edges which I did not like so out came the trusty round knife and I thinned down the leather tapering it right to the edge.
![DSC_0347[1]](https://farm2.staticflickr.com/1576/25532386395_33638e0c85_z.jpg)
I have two new round knives from the same maker but neither of them are any where near as good as this old one which is extremely sharp.
When the front and back pieces were ready I used little clips to hold the pieces in place and measured the distance from the outer edge. I placed the pieces on the work bench and measured the correct distance then clamped a piece of card as a stop.
![DSC_0349[1]](https://farm2.staticflickr.com/1637/24905412903_f91c045444_z.jpg)
I am using contact adhesive on both pieces and you only get one chance to bring the pieces together. The stop allows quick and easy positioning of the pieces once they have been glued.
![DSC_0356[1]](https://farm2.staticflickr.com/1678/25236508100_0a4c8e0729_z.jpg)
Gluing the pieces together worked really well and as you can see everything fits perfectly.
![DSC_0363[1]](https://farm2.staticflickr.com/1516/25164594689_f93ac06781_z.jpg)
The yellow piping is a good contrast to the black leather.
![DSC_0009[1]](https://farm2.staticflickr.com/1635/25652807766_5cd83cb834_z.jpg)
I have added some detail stitching to finish the piping off.
![DSC_0016[1]](https://farm2.staticflickr.com/1535/25694413665_4ea782f073_z.jpg)
I have trimmed the centre section to allow access to the zipper I have also started to finish the edges.
![DSC_0018[1]](https://farm2.staticflickr.com/1522/25393574430_4836df3f45_z.jpg)
I plan to run a line of stitching 5 mm in from the edge all the way around the edge of the case.
It is crunch time no one else is going to fit the cover on this case for me so I have glued the front piece to the inner.
![DSC_0024[1]](https://farm2.staticflickr.com/1531/25110303093_6cc1e32b0c_z.jpg)
The tricky bit is to sew the pieces together after some advice from leatherworker.net I have decided not to glue the spine to the inner or sew it so those stitches are just for show.
![DSC_0029[1]](https://farm2.staticflickr.com/1585/25615943472_b9018fe481_z.jpg)
![DSC_0026[1]](https://farm2.staticflickr.com/1508/25106512874_df5c284635_z.jpg)
It has taken me over three hours to sew this far and I am a sixth of the way around that leaves 15 hours to go. although I do expect to be a little quicker as I do more.
I finished off the front this morning and if anyone is interested I did get a little quicker.
![DSC_0044[1]](https://farm2.staticflickr.com/1680/25646300872_bf846f4110_z.jpg)
I forgot to show this step previously where the leather had been folded around the edge of the grey board the edge was raised I used some wadding to fill the centre.
I spread contact adhesive over both parts but not the spine when dry I used a piece of paper to keep them apart until there were in the right position. Then I pulled the paper out allowing the two sides of adhesive to come together and stick permanently.
![DSC_0049[1]](https://farm2.staticflickr.com/1714/25672199001_56485c587c_z.jpg)
Stitch Stitch Stitch Stitch Stitch Stitch I am sure you get the idea a day of stitching and resting and then more stitching
![DSC_0056[1]](https://farm2.staticflickr.com/1529/25136879954_f191376437_z.jpg)
![DSC_0059[1]](https://farm2.staticflickr.com/1562/25767340395_dae22e8883_z.jpg)
![DSC_0054[1]](https://farm2.staticflickr.com/1549/25767310955_db07d25721_z.jpg)
![DSC_0057[1]](https://farm2.staticflickr.com/1541/25646369232_180fe8a33d_z.jpg)
I still need to finish the edges and tidy up and tie in the end of the threads.
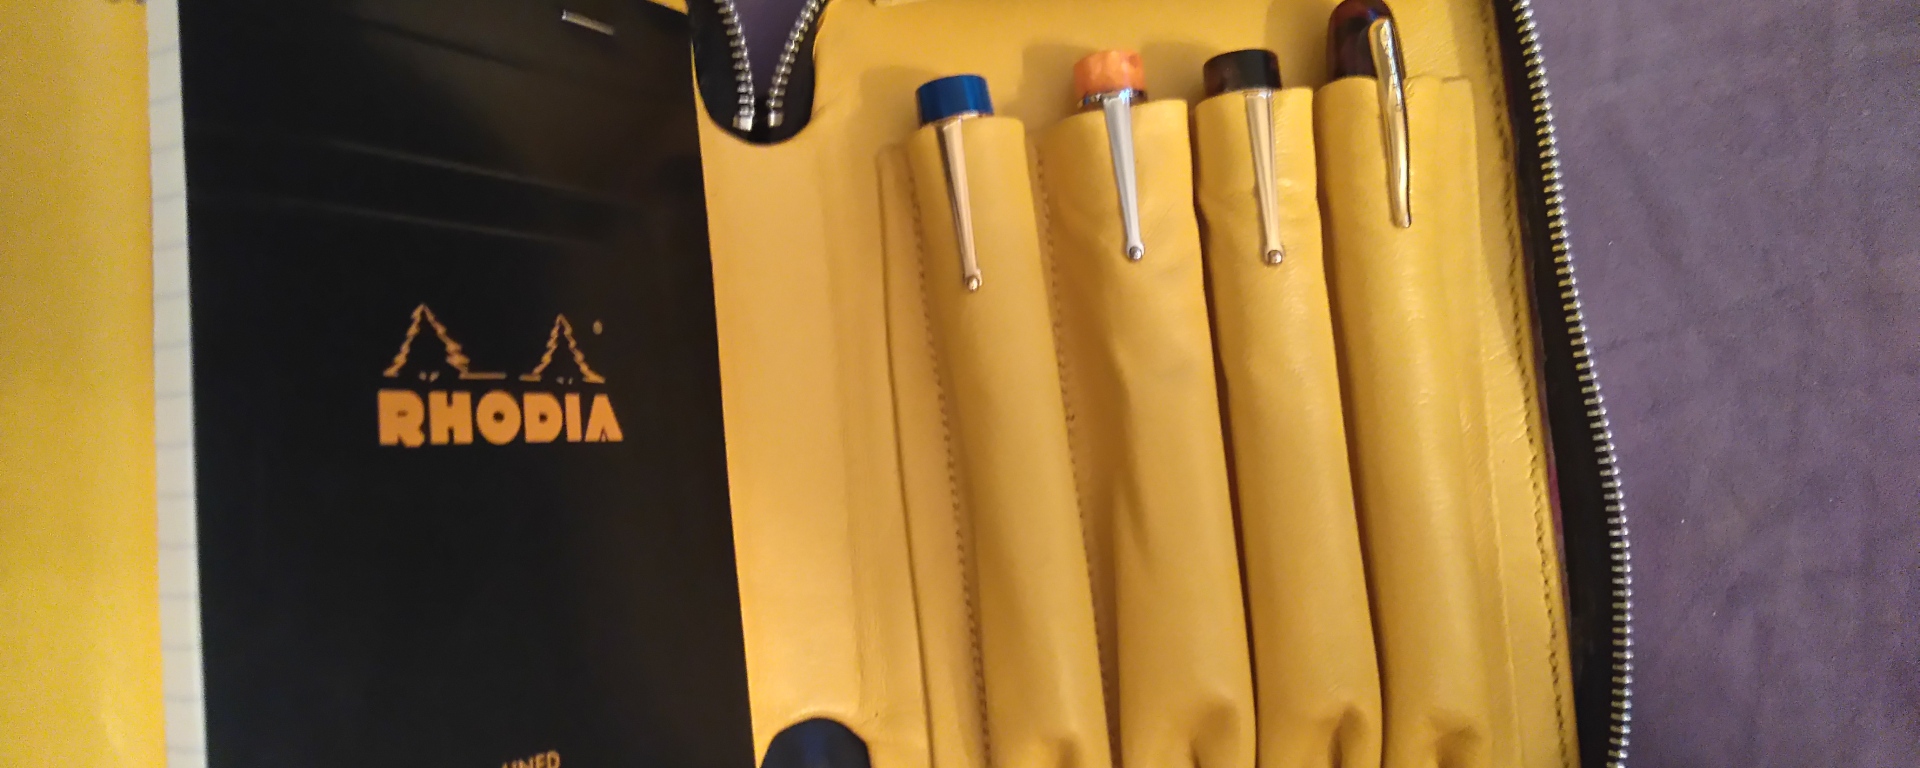
Once finished I will be offering this case for sale
![DSC_0062[1]](https://farm2.staticflickr.com/1638/25691724161_3667f7a162_z.jpg)
![IMG_20160314_152820[1]](https://farm2.staticflickr.com/1595/25486123730_80a8523238_z.jpg)
![DSC_0070[1]](https://farm2.staticflickr.com/1494/25160204213_e8eafffc02_z.jpg)
![DSC_0073[1]](https://farm2.staticflickr.com/1547/25156345124_0c83254392_z.jpg)
Final pictures I just need to add a few more coats to the edges and it will be ready to go.
Thanks for reading
Michael
i have decided to offer this case for sale on fountain pen network and FP geeks forums for $200.

ooh, that sounds like it would look like a classic biker jacket – my favorite way to integrate zips into leather items! looking forward to this 🙂
LikeLike
This case is now for sale on the classifieds section at FP Geeks forum.
Michael
LikeLike
This… looks amazing. And like an awful lot of work. I don’t want to see your fingers just now. I know that kind of thread, and it tends to cut into my fingers while sewing, so I guess I’m not alone in that. Kudos for that awesome piece, and the colors are a great mix.
And once again I’m super jaleous and tempted to make one for myself. 🙂 Though I’d probably spend AGES tooling a picture in the supposed front, then lose interest and have another half-finished project lying around 😉
LikeLike
Thanks my hands in general are a bit of a mess to start with so sewing is difficult. I try to sew things in stages stopping after a line or on a corner so changes in tension are disguised.
I would encourage you to have a go tooling and carving are difficult skills to master but I have seen some fantastic work. I have unfinished projects too I am trying to finish my Gladstone bag right now but the riveting is very difficult.
LikeLike
Well, you inspired me to show off my (meagre) experience in tooling today. Go have a look and tell me what you think (see the pingback 🙂 I of course credited you for the inspiration).
Though really, from your gorgeous stitches it doesn’t show there is any stopping at all in between.
And my next project might just be a pen case… so many ideas, so little time. 🙂
LikeLike
Nadinerpg
Your tooling is far more advanced than mine your project is excellent I look forward to seeing your pen case.
The black and yellow case was seen in stages but with one piece of thread.
LikeLike
Thank you. 🙂 Though really this was tooled after only one weekend-class and four other test-pieces, so I’m very certain anyone can do it.
I’d much rather have more experience in judging cuts to the final outcome, really. I keep making so many mistakes – beginner’s mistakes I’m sure – that it takes a long, long time to finish anything. But I’ll stick to it, it’s such a rewarding hobby, too.
Thank you for sharing your pictures here, they really are inspiring.
LikeLike
I think I see what you mean from the other message. judging cuts is quite difficult I agree I prefer to use my round knife for trimming edges I mark them with dividers. I often trim after sewing and use the holes as a guide for the dividers then I have a dotted line along the edge which I can follow with the round knife. I then use sand paper stuck to a piece of wood to smooth the edges before slicking and polishing.
LikeLiked by 1 person
Wow, that is a… surprisingly simple but awesome solution 😀 I do the sandpaper thing, too. I go from grit to grit downwards (fit for use with water) and the end turns out extremely smooth. Love it. But using the dividers for marking is amazingly simple and helpful 🙂 I’ll try that in my next project for sure.
LikeLike